

When I used to sell farm-raised, hand-processed duck in the market, only a handful of customers really knew its value. Most people I meet who don’t know how to cook duck well will say things like “Isn’t this very fatty?” or “I ate it once and it was too chewy.”
Unfortunately, duck meat gets a bad rap due to poor preparation. That’s a shame, because duck cooked properly is one of the tastiest, healthiest, and (probably) most sustainable sources of meat. Ducks are also excellent workers for your edible landscape, food forest, and even your garden (sometimes).
If you happen to be one of those people who knows the joys of perfectly cooked duck, or are interested in doing away with duck’s bad rap by cooking it at home, read on for some delicious details on how to cook duck!
gentle age

The first thing to know about cooking duck is that age matters. For large breeds of fast growing, flightless ducks, such as Peking ducks, processing at 3 months of age will yield the most tender meat. For birds that are still in flight, regular harvesting before they start flying ensures softness.
As with any breed of duck, once they reach full body weight and start covering longer areas to forage and maintain that weight, their muscles become leaner and less supple. Young ducklings are essentially like the “veal” of a duck. Similar to veal, the more restriction and less movement of the muscles during growth, the more tender the meat.
But personally, I can’t imagine confining a duck without access to fresh pastures and ponds. Moreover, the real free-range ducks are older, have a lot more taste than young ducks, have a color like steak, and have a better taste. For older, more experienced ducks, good preparation is key.
If you plan to roast a whole duck, be sure to start with a duckling. However, if you want a more intensely flavored duck, plan to prepare each piece of duck (leg, breast, tenderloin, wing, and carcass) using a different cooking method.
Here are some basic preparation instructions to get you started.
duck breast
On carnivorous ducks such as Muscovy or Peking duck, one breast is usually enough for two people. For small plates or tapas style dishes, you can even cut chicken breasts into rounds (after cooking) and serve up to 6 people.
Simple prep works best with duck breast.
Method 1: Roast Duck Breast

After processing or thawing, age the breasts in the refrigerator in a covered container for 1-2 days. This is important because freshly processed meats benefit from the rest time before cooking. Store-bought duck is frozen fresh, so it also needs to be aged after thawing.
Pat the duck breasts dry. Use a sharp knife to scratch the skin. Rub the salt into the breast. Use enough salt to allow some to penetrate the entire breast. You can also add pepper and herbs at this point to taste. Chill marinated chicken breasts in the refrigerator for 1 hour before cooking.
Heat a cast iron skillet. Melt two sticks of butter in a pan. When your pan is almost smoking, wipe off any excess salt from the duck and place it fat side down in the pan. After the initial frying (approximately 1-2 minutes), lower the heat and cover the pan. Cook for an additional 7-8 minutes if medium to medium rare or longer if medium to good.
Flip breast over and cook meat side up for 1-2 minutes. You just want to cook it long enough to get a darker color on the meat side. Remove the chicken breasts and let stand on a cool plate for 10 minutes. Slice and serve.
You can also “deglaze” the pan by pouring about 1/2 cup of stock or wine into the still hot pan and swirling it. You can then use this liquid as a sauce for the breasts. Make sure the liquid you’re using is room temperature (or warmer) so you don’t break the pan.
method#2: duck ham
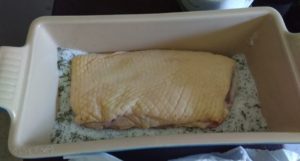
Bury the duck in salt and store it in the refrigerator for two days. Remove breast, rinse and pat dry. Hang the breasts in a thin cloth at 10-21°C (50-70°F) until dry (usually 2-3 days). Slice the finished ham and place on a garnished plate.
Safety Precautions: Similar to steak and ham prosciutto, many people eat duck and raw salted duck. However, like driving or eating sushi, this is a personal choice and has inherent safety risks. To learn more about safe duck preparation recommendations, read the USDA’s food safety guidelines related to preparing ducks.
read more: USDA Food Safety Guidelines for Duck Meat
duck leg
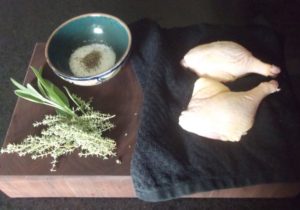
Duck legs, also known as thighs, usually include the entire leg and part of the back. The thigh muscle is the most worked muscle in any species of duck and tends to be tough in texture in both young and old ducks.
method#3: Slow Cooked Duck Legs
To tenderize duck legs, start by massaging about half a tablespoon of salt into each duck leg. Cover, let stand and marinate in the refrigerator for 2 days. Then rinse legs and pat dry.
Heat oven to 250°F (121°C). Place the legs (skin side up) into the pan that fits snugly. Pour some liquid (wine, stock, or water) into the bottom of the pot. Put a pat of butter on each leg. You can also stuff garlic cloves or fresh-cut herbs such as rosemary, thyme or hyssop around the legs for extra aroma and flavor.
Cover and cook for about 4 hours. Periodically, approximately every 20-30 minutes, open the pot to stew the legs.
Elective: If you don’t want to worry about simmering the meat for longer than 4 hours, add enough liquid to completely cover the legs. For the final hour, drain the liquid and continue cooking, allowing the skin to dry out and become crispy. Braising is done in the final cooking process.
The meat is done when you can start to peel the meat off the bone with a fork. If it feels like you need to cut it with a knife, cook it longer. Continue to simmer until you remove it from the oven to prevent the skin and edges from drying out.
If the skin isn’t crispy enough for your liking, place the legs under the broiler, skin side up, for a minute or two until perfect.
method#4: Oil-sealed duck legs
Duck confit is a delicate French delicacy prepared in much the same way as slow-cooked duck leg. However, instead of using the liquid and stewing the leg, you need to completely cover it in lard (either duck fat or lard).
Alternatively, reduce the temperature to 200°F (93°C) and cook for 5-6 hours for better results. Add more lard as needed to keep legs covered while cooking. The skin is toasted until crisp at the end of cooking.
Once the legs are almost (but not quite) free from the bone, place the legs in a jar, cover them completely with some pan-cooked lard, cover them, and leave in the fridge for a few days to a month. The longer your legs are refrigerated in duck lard, the tastier and more tender they will become.
Again, the procedure does not meet USDA guidelines for safe meat handling. So, if you have safety concerns, you can also eat duck legs immediately after cooking, either hot or cold.
other parts
There’s so much more to delicious duck than just breasts and thighs!
method#5: Duck sauce
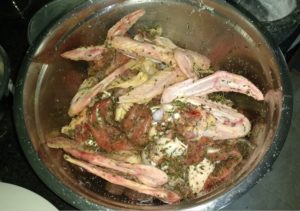
Rillette is basically potted meat. It’s a pate that can be spread on bread or biscuits. This is my favorite way to prepare aged duck and uses leftover wing and carcass meat from other cuts.
When making a cooked sauce, salt the meat as you would for a duck confit. I use about half a tablespoon of salt per pound of meat for my marinade. Refrigerate for 2 days, wash, dry, cover with lard, and simmer at 200°F (93°C) until the meat begins to fall off the bone.
You can add herbs and spices as you cook, such as freshly ground pepper or quatre Epice (a French spice blend), to personalize your cooked sauce. You can also finely chop and add herbs like tarragon, thyme, and parsley to rillettes for extra aroma.
Drain the fat from the pan. Let the meat cool. Pick the meat off the bone. Shred the meat and mix with some of the fat from the pan. Pack the roux into jars. Pour 1/2 inch of fat over the roux to seal the meat underneath. Close jars and refrigerate. Salt, slow cooking, and fat act as preservatives, keeping the meat safe to eat for longer than cooking it alone.
Many people will keep cooked sauces in the refrigerator for a month before serving to develop the flavor and texture. Others will can it and eat it within a year. Personally, I would never wait more than a week. The few times I’ve managed to restrain myself though, I’ve found that deli meats get better after a few weeks of storage.
method#6: Tenderloin snacks
The tenderloin of the duck is located just below the breast.it is anchored to the sternum by a not very tasty A piece of silvery skin. Many people have trouble getting the silver skin off the tenderloin without breaking it.
Instead of worrying about making it perfect, the tenderloin is scraped off the silver skin, minced, and sautéed with garlic, butter, salt, and pepper. Like the garlic, the tenderloin only needs to be cooked for a minute or two. So, heat up the pan and let the butter melt before adding the chopped tenderloin and garlic.
Once the pieces are light brown, remove them from the heat. Add it to salads, on toast, or like bacon slices over some creamy puree.
method#7: Duck Soup
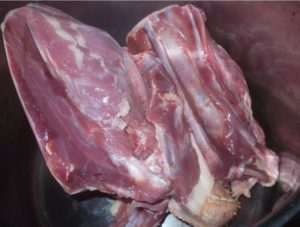
Aside from the cuts mentioned above, I take the rest of the carcass, including the neck and any excess skin and fat, and cook it in bone broth or stock. For more details on the uses and benefits of bone broth, check out this article:
read more: “Benefits of Bone Broth: Myth or Magical Mystery?”
method#8: duck fat

After freezing the stock, scrape the fat from the container that has risen to the top. Use it like butter for savory dishes.
add your favorite flavor

All of the above methods are just starting points for preparing duck. You can use these basic techniques and pair them with a variety of other ingredients. Orange juice, gravy, wine concentrates, Asian flavor preparations, etc. all pair well with duck.
in conclusion
Duck is an extremely versatile, tasty and healthy meat that is easy to raise at home.If you want to learn more about raising ducks for eggs, meat and fun, please consider joining Honors Lab And get the 8-part Backyard Duck Certification, including detailed information on how to raise, process and cook.
And you?
What’s your favorite way to cook duck? Let us know in the comments below!
(3,633 visits, 2 visits today)

Tasha Greer is a regular contributor to The Grow Network and has co-authored several eBooks with Marjory Wildcraft.the author is “Grow Your Own Spice” (December 2020), and she also blogs for MorningChores.com and Mother Earth News. For more tips on the homestead and herb and spice gardening, follow Tasha: Simplestead.com.

