

Disclosure: This content is supported by readers, which means that if you click some of our links, we may receive commissions.
An organization chart is almost a necessary document for any business or organization. It has many benefits, from helping employees better understand how the business works to being essential when applying for funds or grants. Although an organization chart is a visual representation of a business structure, you do not necessarily need design experience to create your own organization chart. Using platforms such as Microsoft Word can simplify the process, so even if you have never made a chart before, you can get a professional-looking chart.
Why it’s worth creating an organization chart
Creating an organization chart requires some time, effort, and thinking, but it is well worth the investment. In the most basic case, an organization chart makes it easy for anyone to understand the structure of your business at a glance. This is especially valuable for helping new employees locate and assisting employees in large organizations to track all employee roles. The organization chart also makes it very obvious that individual roles and who reports to whom.
But the role of the organization chart is much more than that. They can also help clarify the responsibilities of employees, which is very valuable in helping employees understand who to contact on specific issues. This is also important for supervisors and leaders to better understand and evaluate the business structure and focus on change, streamlining and improvement.
Employees can benefit from the organization chart in many ways. If you create organization charts to include employee contact information, these charts can be valuable resources within and across departments and teams. The organization chart can also help employees better understand the business structure and provide useful visual representations of promotion and promotion routes and potentials. A well-designed organization chart can motivate employees and encourage them to seek long-term employment and promotion opportunities in your company.
The detailed information provided by the organization chart can help make key decisions. Managers may want to view the organization chart to understand the workflow and workload. The detailed information of the organization chart can help make important asset allocation decisions and is beneficial during expansion or layoffs. When the management fully understands the structure and operation of the enterprise, they will be better prepared to make appropriate and profitable decisions.
Organization charts also have important practical uses. If you run a non-profit organization and apply for grants, most funders will need to include the organization chart as part of the standard application. When applying for a business loan, it is also important to prepare an organization chart, as it shows that your business is well organized and professionally operated.
Whether you are starting a small business or running a complex company, it is worth the time to create (and maintain) an organization chart. Once you have created an organization chart, they are very easy to update, and your business will definitely benefit from them in many ways.
The investment required to create an organization chart
It is absolutely possible to create an organization chart with minimal or no financial investment, but it requires time investment. If you have a small start-up company or other small business with an established structure, the task of creating an organization chart will be simpler than that of a large company or a company with changing roles and structures.
When creating an organization chart, the most important time investment lies in the planning and detailed information of the chart information. In some cases, this may involve collecting employee names and information, discussing employee hierarchies, or even determining workflow when you reorganize or work with a new company. Correctly handling these details will significantly improve your ability to create an organization chart that accurately reflects your organization.
After determining the information to be included in the organization chart, you will need to use basic design and organization skills. Many programs can handle most of the design for you, and you can get professional-looking charts without a design background. It takes some time and patience to finalize the details, but the use of high-quality procedures can minimize the time required for chart design.
Depending on your business, you may find that multiple organization charts are needed to best outline the structure and positions. Creating an overall diagram will be the most challenging and time-consuming part of this task, and you may need to involve multiple leaders to help define roles and hierarchy. For broader operations, creating an organization chart may require collaborative effort, but the time investment will pay off.
To create an organization chart, you can use many different programs, such as Microsoft Slides and canvas. This guide will focus on how to use Microsoft Word Create an organization chart. Most businesses have already subscribed to Word, which means you will not face any additional costs.
8 steps to create an organization chart
These steps will guide you through the process of creating an organization chart using Microsoft Word.
#1 – Plan your organization chart
Before you start using the software to create an organization chart, you need to make some preparations to ensure its success. First imagine the type of chart you want to make. You can organize the chart in a top-down hierarchy, starting with your CEO, and then displaying positions below. Or, you can create a department chart that focuses on business departments and departments such as finance and human resources.
The type of chart you create depends on your goals and how you plan to use the chart. You may find it helpful to create multiple different versions of the organization chart to support new employees, decision makers, funding applications, etc.
As you plan, it’s also important to start mapping the information you want to include. Now is the time to decide if you only have employee titles, or if you also want to include names, contact information, and even photos. You may need to collect other materials, such as contact information and pictures, and talk to the team leader to make sure you understand the relationship between their team and the different positions in the department.
Before using the design procedure, it is helpful to draft the entire diagram on paper. Paper gives you the freedom to design and experiment with different layouts until you decide which option is best for the information you need to include. Every business has a different structure, so investing more time in visualizing and planning the organization chart can make it easier to create the chart.
#2 – Open a new document and select SmartArt
First open a new Microsoft Word document.Click on Insert label, Then click Smart art.
#3 – Choose your organization chart template
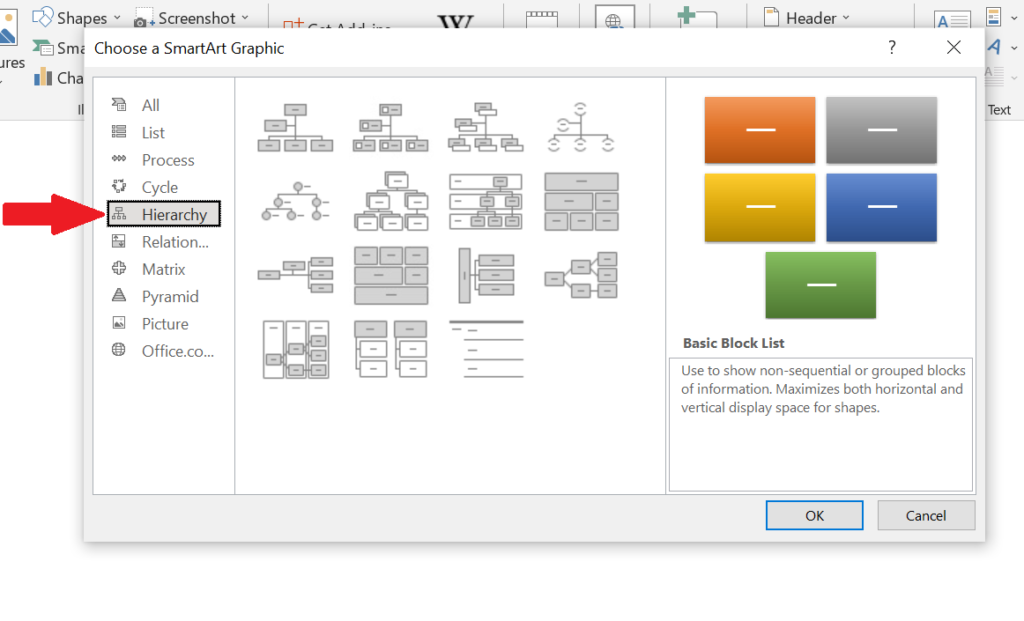
Click on Hierarchy Options in the left menu bar. This will display the organization chart templates available for Word.
Click the template of your choice, then click Row Select the template.
When choosing a template, please consider what you have decided during the planning stage and what you want the finished product to look like. If you need help, click on each option and read the summary shown in the column on the right.
#4-Enter your text
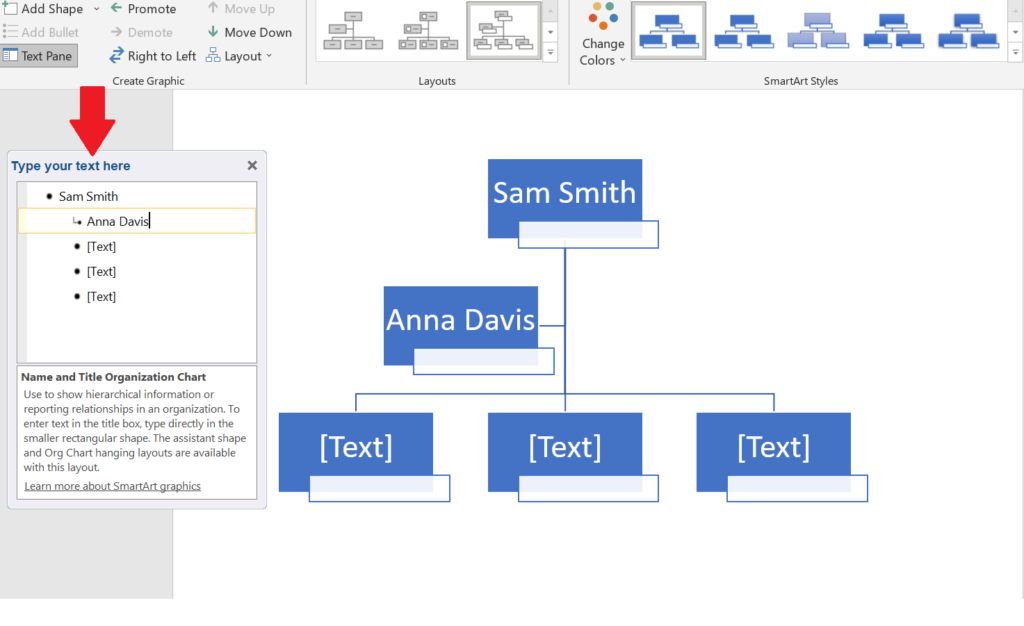
After the template loads, start typing the text you want the chart to contain. Depending on the chart layout you choose, this text may be an employee’s name, job title, or other information.
Enter text by clicking on the corresponding field that appears in the text editor window on the left. The editor will guide you down the organization chart in a logical sequence.
When entering text, you may need to change or resize the text. You can do this by highlighting the text and using the font size and selection drop-down menu in the “Home” tab, just like in a traditional Word document. You can also click on the corner of any shape and drag it to adjust the size as needed.
#5-Add shape
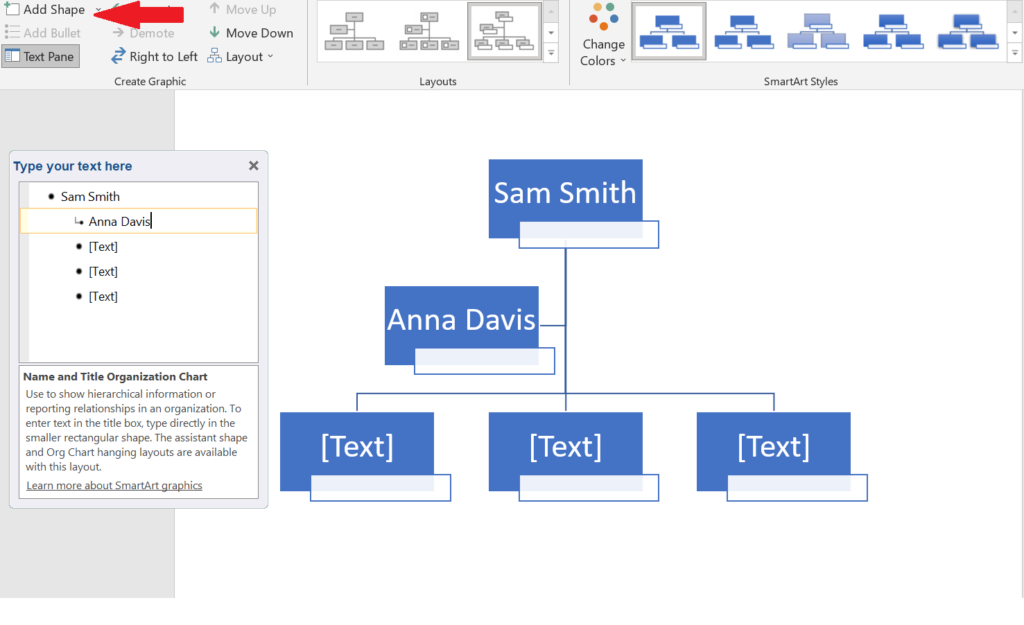
Each template contains some shapes when you initially open it, but your business may require more space than the initial template contains.
When filling in the organization chart, you can use Add shape The function in the upper left corner to create more.Just click Add shape, Another one will be added to the organization chart.
#6 – Reposition your shape
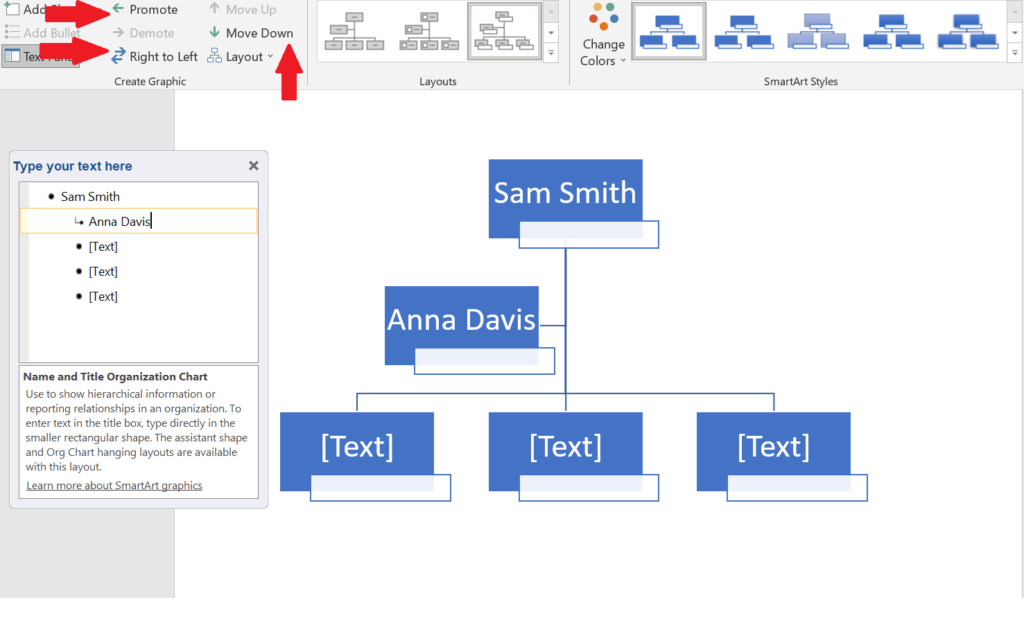
When adding shapes, you also need to make sure they are in the correct position. You can click and drag the shapes to different positions, but if you need to move them vertically in the hierarchy, this can become tricky. On the contrary, using the shape movement function can be easier and more accurate.
To reposition your shape, you can use promote, Right to left, and Move down Functions in the top menu. These functions are not manual drag and drop, but maintain a clean, professional appearance and ensure that the size and position of the shape are correct relative to the rest of the chart.
Although these features are helpful when initially designing your organization chart, they are also helpful when you reorganize or develop a potential reorganization plan. You can easily move employees for visualization and planning.
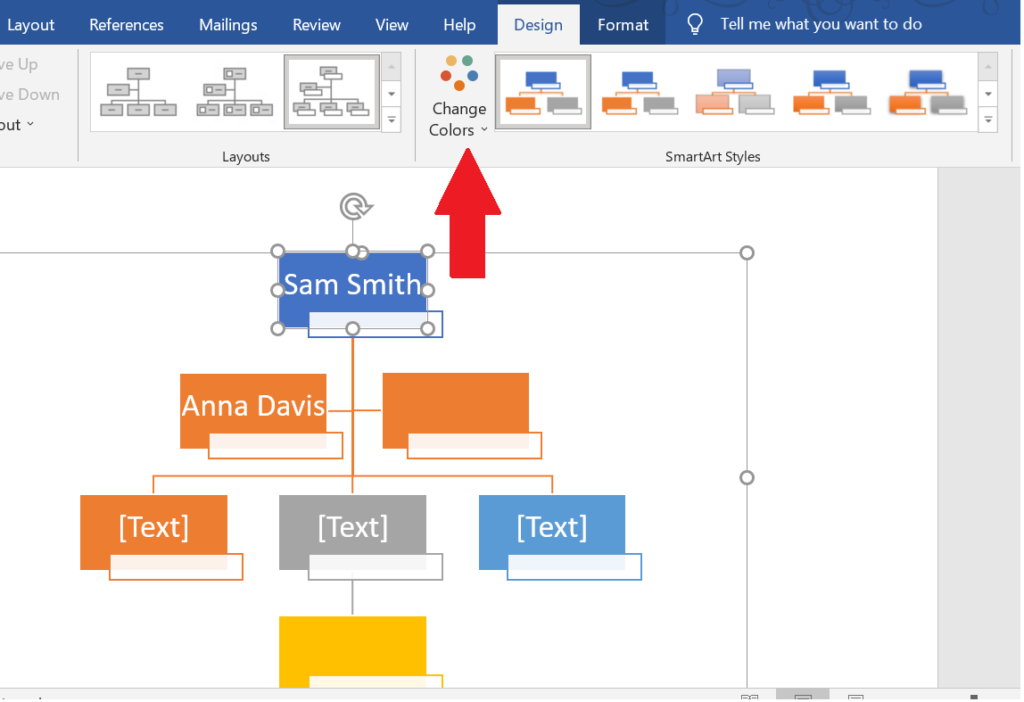
#7-Custom colors
To complete your organization chart, you can use Change color Options in the top menu Design tab. When you click Change color Option, you will see various pre-designed color schemes. This helps you create professional-looking charts, even if you don’t have a design background.
If you want more control over the colors in the chart, you can right-click on each shape to choose custom colors, styles, and fonts. Changing these small details will have a major impact on the completed organization chart. Consider using your company’s brand colors or other meaningful color schemes for organization charts to visually represent your business and fit your other brand materials.
In addition to using colors to personalize the organization chart, you can also choose to add other elements, such as employee photos. Charts with employee photos are very useful for new employees to understand the company and its employees.
#8 – Save your document
Don’t forget to save the document when you are done! It is also a good idea to save documents frequently when working with organization charts.
If you plan to create multiple versions of the organization chart now or in the future, please carefully consider your file naming process. It is helpful to name the version with a date or other descriptive phrase. This will help you stay organized, especially when referencing different versions of charts in the future.
Don’t forget to update your organization chart when staffing or business structure changes. You may find it easiest to assign this responsibility to one person in your business, which helps ensure that your organization starts to remain accurate.
When you share diagrams throughout the enterprise or with stakeholders, remember to share them as PDFs. This prevents anyone from making unapproved edits and ensures that your original version remains correct.
Next step
Microsoft Word helps simplify the process of creating an organization chart, ensuring you get professional-looking results and the charts are easy to edit. If you are going to create an organization chart for your business, you can use Microsoft Word or choose from other programs such as Canva. Many HR software platforms also provide the ability to create organization charts, and you may find that your business is already using one of these platforms.Must check out Our review of the best HR software learn more.
This article was written by Daily Eggspert today.

