

Low tunnels are an inexpensive DIY way to extend the growing season. Learn how to build a low tunnel that suits your climate and needs.
How to Build and Use Low Tunnels for Inexpensive Season Extension
Want to eat fresh homegrown veggies all winter long? This video shows an inexpensive and easy way to extend the growing season into winter. (If your garden soil is freezing right now, remember that you can also use this method to extend your growing season on the other side of winter, so you can get a jumpstart in your spring garden.)
When you build a low tunnel, you are building a very simple structure. (Note that low tunnels have different names in different regions. I’ve heard them called hoop houses, cloches, and cold frames. Those terms get the point, but they each technically refer to something else. So For clarity, we’ll call it the low tunnel.)
The Best Materials for Constructing Low Tunnel Frames
To build a low tunnel, you can start with a simple ring structure. I’ve seen people use PVC pipe, PVC electrical conduit, rebar, cow panels, and flexible fiberglass poles (like tent poles) to build a low tunnel frame. In my opinion, the best option is PVC – unless you already have one of the other materials on hand. A 10-foot piece of 1/2-inch 40-gauge PVC pipe typically sells for under $2, so it’s affordable. PVC electrical conduit The cost is about the same, and it should last longer in the elements.
You can also enjoy:
By popular demand, we’re offering a step-by-step DIY Hoop House plan for only $30! Click here to buy now
“Top 5 Things to Consider When Building (or Buying) a Greenhouse”
My favorite way to secure a job is to drive a piece rebar Go into the ground and install the PVC over the rebar as shown in this video. (Though it’s ludicrous to think that you can insert rebar 2 feet into the ground in my area. It’s solid rock, so we use about 1 foot of rebar, and we can usually get them to about 8 inches deep.) I also see a lot of people using pipe belt, screw into the sides of their raised beds. I think the rebar method is better – especially if your bed is a few years old and the wood has started to crack. Also, the rebar method can be done on any bed or row, even without a frame.
The final element is the cover, and this is where I hear a lot of arguments about which material is best. . . .
Plastic and cloth as low tunnel cover
There are two common options: plastic or cloth.
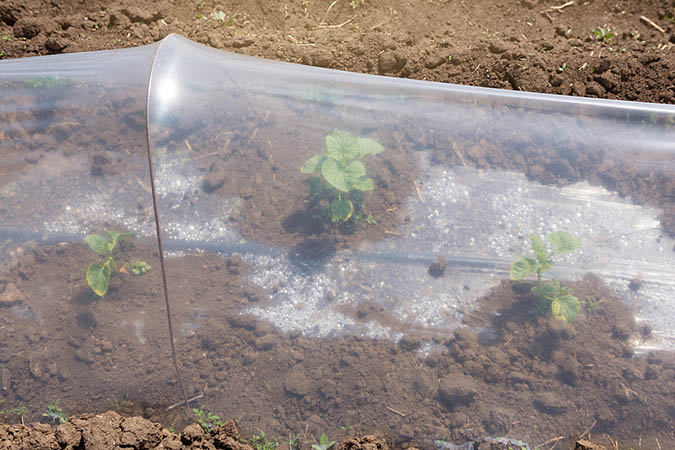
The plastic film allows light to reach the plants, but it does not allow any air circulation or water penetration. If you’re protecting a bed that has drip irrigation installed, water probably isn’t an issue. But without air circulation, the plastic can easily overheat the tunnel on a sunny winter day. If you use plastic, you will need to properly remove or vent the tunnel to avoid suffocating your plants with hot, humid air.
Cloth is a better choice for air circulation and water penetration. floating cover A cloth made of woven synthetic fibers that allows hot air to escape and water to enter while providing insulation and light transmission similar to plastic film. In my relatively warm and dry climate here, fabric hoods are perfect for low tunnels. Be careful when using old sheets and blankets in wet weather—they can absorb water, and they can actually cool the air when the water evaporates.
5 Dos and Don’ts When Using Low Tunnels to Extend the Growing Season

Some tips and pointers:
• climate: Consider your climate when choosing the material to use to cover your tunnel. Where I live, I need to use every drop of rainwater, so I use cloth instead of plastic. If the soil moisture needs to be regulated with heavy winter rains, plastic may be a better choice.
• Upright: If you’re building a long, low tunnel, or if your garden gets very windy in the winter, consider using an extra length of pipe lengthwise at the top for structural integrity. Use twine or zip ties to secure it to the hoop, not the pipe.
• Staples: In the video above, they nail the plastic to the raised bed frame. I would skip this step and use rocks or bricks to weigh the plastic instead. You’ll extend the life of your cover and make it easier to ventilate on warmer days.
• lamp: You can use a string of Christmas lights inside the tunnel for added warmth. If you do this, you will need to use old fashioned incandescent bulbs. Newer LEDs are more efficient, but they don’t provide as much heat. In this case, you need inefficient bulbs that use more energy and generate more heat.
• Survival blanket: You can add a survival blanket over your comforter for extra warmth on cold nights. Turn the shiny aluminum side down, remove the blanket, and let the sun warm the soil again the next day.
Check “Anti-freeze prolongs the growing season” From the Colorado Master Gardener Program and CSU Extension. They tested a low tunnel with 4 mil plastic sheeting, a survival blanket, and 25 string C-7 Christmas lights. With all three measures in place, they consistently increased the temperature inside the tunnel by 18 to 30 degrees.
To learn about other creative ways to add heat to the interior of structures during the winter, read these two great articles from our writing competition. Here’s the technicality: “Mad Scientist Works to Bring Greenhouse Heating Down to -25F Independently.” This is practical: “Save the heat in a small winter hoop house.”
If you want fresh, home-grown veggies this winter, but don’t want to build a structure, here’s a much smaller-scale solution that you can place on your kitchen counter: “Grow sprouts and microgreens indoors all winter.”
What do you think?
Have you ever built low tunnels? What’s your favorite way to add or retain heat in a low tunnel or other cool-weather gardening structure? Let us know in the comments below!
__________________________________________________________________________________________________
This is an updated version of an article originally published on November 23, 2015. Authors may not be able to respond to comments at this time, but we encourage members of our community to get involved sharing their experiences and answering questions!
The Grow Network is a participant in the Amazon Services LLC Associates Program, which is designed to provide a way for our team to earn fees for recommending our favorite products! If you purchase something after clicking one of our links, we may earn a small commission at no additional cost to you. Thank you for your support of TGN!
__________________________________________________________________________________________________
Thanks to Natalie Donnelly, John Garlisch, and Nissa Patterson of the New Mexico State University Bernalillo County Extension Service for the great video.
Thanks to David Whiting, Carol O’Meara, and Carl Wilson, CSU Extension, for the PDF “Freeze protection and extended growing season.”
(7,361 visits, 13 visits today)

