

wax is a free and user-friendly website building platform that includes some powerful built-in features. It’s easy to see why over 110 million users prefer it.
Its intuitive technology, drag-and-drop editor, and hundreds of attractive and powerful templates make it our top pick best website builder You can get your hands on it. From blogs to business websites to e-commerce stores, Wix does it all, and it does it well.
But how to get started with the platform? Please read carefully to find out.
Why Wix is worth it
In short, Wix is great.
It comes with a complete set of tools to build a solid online presence. Plus, you can easily design professional-looking websites without knowing a single line of code.
Small businesses, creatives, and beginners alike love Wix’s feature-rich interface. In addition to tons of apps and SEO tools, the platform offers over 800 professionally designed and fully customizable templates. So you don’t have to do any hard work while building your website.
Wix handles some of the larger backend needs for you. That said, they offer 24/7 hosting security on all plans, maintain the highest level of security standards for all users’ sites, and monitor and optimize without your fingertips.
They also do a lot of work to ensure their infrastructure is reliable so that your website is always available. Automatic backups of your site data are stored on multiple servers, so you can restore your site if something goes wrong. These servers work together, running on AWS, Google Cloud, and other platforms to ensure that the site is always available, even during backend maintenance.
What’s more, the service is free and has something for everyone. Yes, Wix is free for anyone with a computer to create as many websites as they want.
You can also visit Wix’s app marketplace, which offers over 250 professional solutions to further customize your website. We highly recommend that you download powerful business tools to take your website to the next level and make money from it. You can use these tools to collect leads, analyze visitor traffic, engage with customers, and more.
Good site speed and an efficient support team are the icing on the cake.
Investment required to use Wix
When we say Wix is free, we mean it.
The platform has a freemium plan with up to 500MB of storage, which is great for building and testing your website if you run a blog or small store. All you have to do is sign up for Wix’s free plan, create an account with your email address, and get started.
However, one day you will want more (don’t we?).
In this case, you will have to pay some extra cash – not much, but still not free.
The good news is that Wix offers a lot of Subscription plan to meet specific needs. Here is the full list for you to choose from:
- Combo – $14 per month if paid annually. Upgrading to this plan will remove Wix ads from your portfolio, personal website, service business, and more.
- Unlimited – $18 per month if paid annually. This plan significantly increases your storage space, making it perfect for content-rich growing websites.
- Professional Edition – $23 per month if paid annually. Upgrading to this plan will enable you to strengthen your marketing and branding.
- VIP – $39 per month if paid annually. Having this plan will give you priority support and maximum storage limits.
In addition to the plans above, Wix offers business, e-commerce, and enterprise plans starting at $23 per year—provided you choose the annual plan.
Pooh! Talk about options. You can choose the plan that best suits your requirements.
Another investment is a custom domain name. You don’t need to have a custom domain to use Wix, but your website URL will look like this: username.wixsite.com/website. For more specialized URLs and custom domains, you will need to obtain a by Vickers.
It’s important to note that you must upgrade to one of their premium plans to connect your custom domain to your Wix site. You can’t do this on the free plan. However, when you upgrade to the premium plan, Wix offers a free domain coupon for one year of free domain registration with Wix. After that year, you must pay an annual fee to renew.
We recommend that you purchase a separate domain name, which can cost anywhere from $10 to $20 per year.View our top picks Best Domain Name Registrar Find the best fit for your needs. One reason we recommend this is that if you decide to leave Wix, it will make it easier for you to keep and transfer your domain name if it comes from a separate domain registrar. Fortunately, a domain name is a small investment.
That’s your monetary investment. The answer is more subjective in terms of your time.
Generally speaking, it takes about two hours to set up a website on Wix. But that’s not a perfect estimate, because such a site isn’t good enough for search engine results (SERPs). And if you plan to build a complex e-commerce site with numerous taxonomy levels, it may take longer, and it will be updated over the next few months and years.
In the end, it comes down to your skills, website requirements, and website vision.
6 Steps to Using Wix
Finally, to the fun part! Here’s how to make a website with Wix:
Step 1 – Create an Account with Wix
go www.wix.com then click start using. Enter your email address to create your account.
Before registration is complete, you must answer some short questions about your new website.
Step 2 – Choose how to create your website
Next, you must decide whether you want to create a website in the Wix editor or let the Wix ADI tool design one for you.
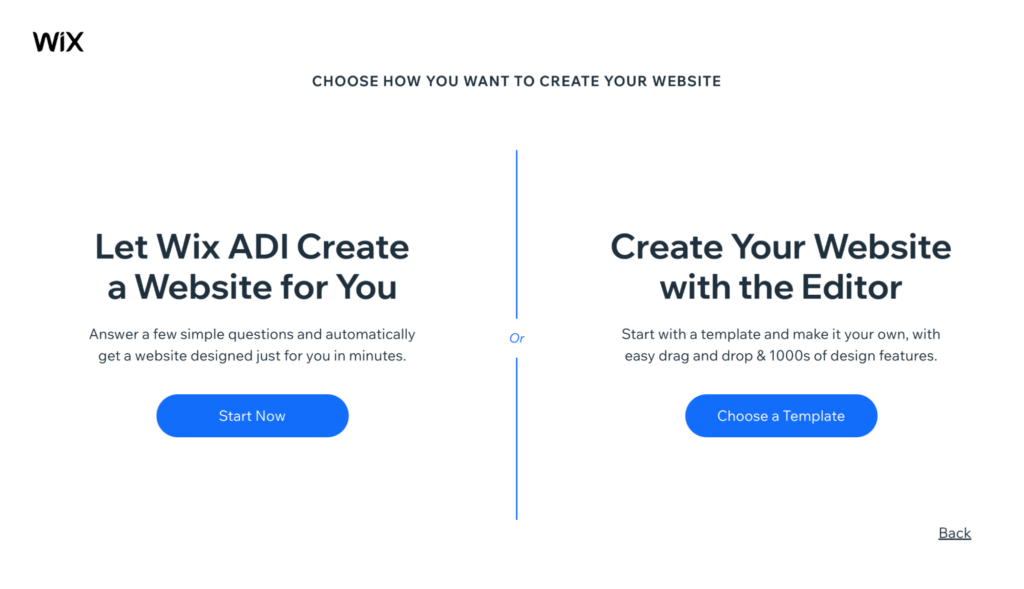
While useful, Wix’s Artificial Intelligence Designer (ADI) tool has limited design and customization options compared to Wix templates and editors.So, if you have a basic understanding of website design and are confident in your website building skills, click Choose a template.
If you are new, ADI tools may be a better choice.In this case, choose Start now. You have to answer some questions about your new project to get a proper custom solution.
Here’s a brief overview of what you’ll see in the editor:
- element: You can click on an element to customize it, where you can also change images, write text, add buttons, and more.
- Add page: go page,then click add page from the top menu bar. You will see many new page types and pre-made page templates. Choose the one you like.
- design: To change your website theme and layout or change colors, fonts, and other elements, click design in the top menu bar.
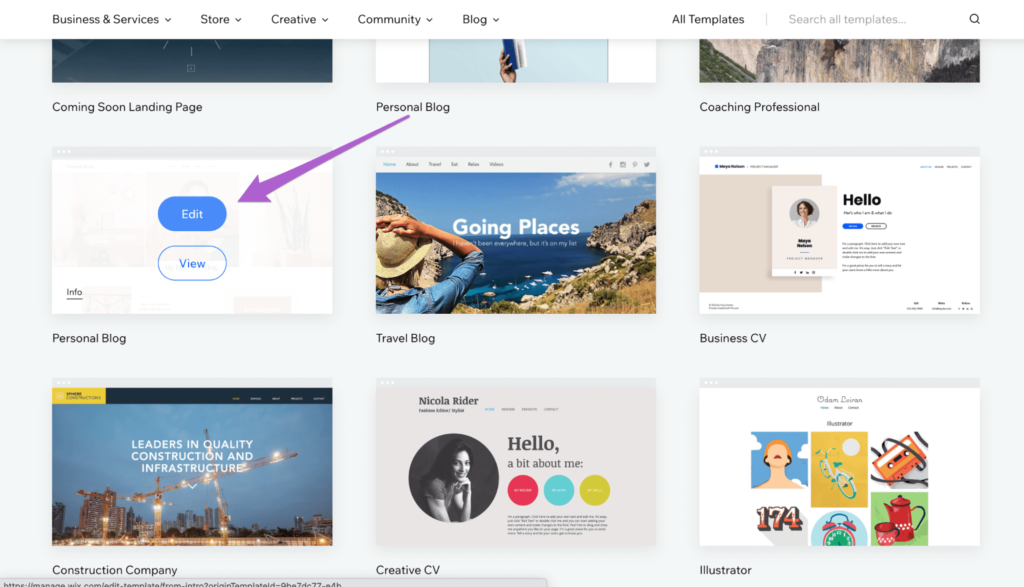
Step 3 – Choose a Wix Template
Assuming you decide to use Wix Editor, here’s what you need to do.
First, you have to choose a website template based on the type of website you want. You can filter templates by category and view each template in demo mode to see how it looks.Once you find the template you like for your project, click edit.
Step 4 – Customize Your Website
After choosing a template, you can use its drag-and-drop functionality on the Wix editor to customize it.
Click any element on the page to change its settings, reposition or resize. You can also change colors, rewrite text, add images, and more. Anything you want, really. Any changes you make are displayed in real-time, so you can see exactly how your site will look to your visitors.

The top menu bar is your one-stop place to find some important Wix Editor features to customize your website.
- Page – This allows you to switch between website pages and blogs.
- Desktop/Mobile – Use it to switch between desktop and mobile modes. It can be useful to edit your site for both devices.
- set up- If you want to add a favicon, see website analytics, or just make some tweaks, this is the place for you.
- Save/Preview/Publish – You must take care to save your website at all times. Also, you can use it to preview your website up front and publish it when you’re ready.
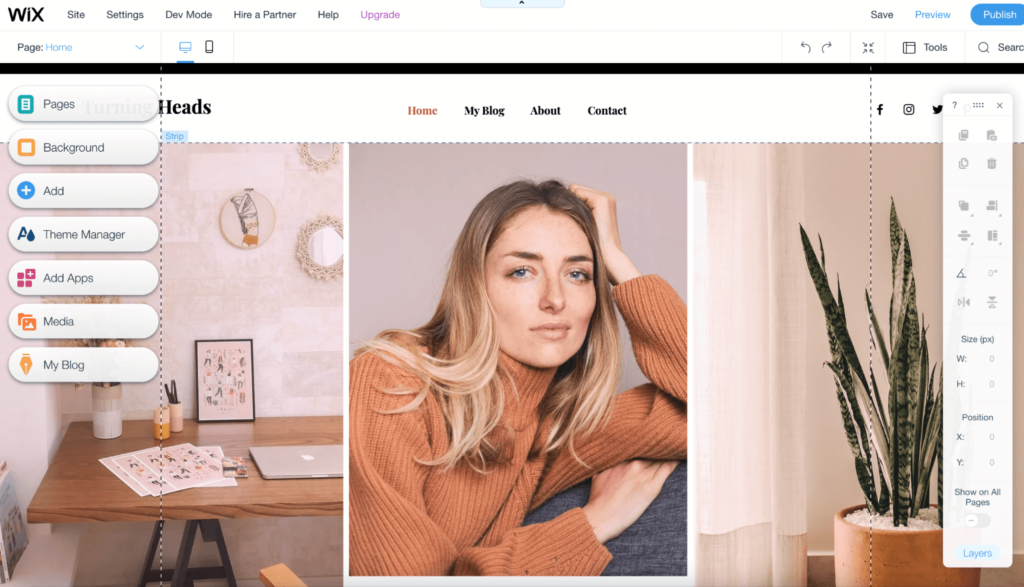
If you want to further customize your site, you can select any of the options on the left side of the screen, including Pages, Backgrounds, Add, Theme Manager, Add Apps, Media, and My Blog.
Let’s decode each of the categories below:
Pages and Menus
You can find all pages here.
Here you can add new pages, hide, delete, and rename pages, and change the order in which pages appear in the menu. You can also access the settings of the page, namely:
- Search Engine Optimization- Here you can add metadata for all pages. Doing so will help your content rank higher in search engines.
- social sharing – This option allows you to include images and text that will be displayed when a specific page is shared on social media platforms.
- Permissions – This allows you to control who can view each page. You can also use it to create restricted content or members-only pages.
background
Here you can change the background color or image for your website, or display a video background (whatever you like). Wix’s free media library has many attractive options, and you can also upload your own media.
element
click Add to Will give you access to various elements that you can add to your website pages. These include:
- galleries and images
- interactive slideshow
- video and music
- button
- form
- Box
- grid
Adding elements to your website is a simple process. All you have to do is drag and drop it to the appropriate location on the web page.
Blog manager
click start blogging Add a blog to your website.follow it click Add it now. Doing so will add the Wix Blogging Manager app to your website.
choose Create new post Add and publish new posts in Blog Manager.
To view and manage your posts, visit my blog, Followed by Manage posts.
Step 5 – Download the Wix app for improved functionality
As mentioned earlier, Wix has an innovative app marketplace where you can download free and premium apps to enhance the functionality of your website.
To evaluate the market, click Add app Select Options from the left, then browse the marketplace to find options that interest you.

To add an app to your site, you must open the app page and click add to site Start the installation process.
Then you’ll want to use it and see how it interacts with other elements on your site and make sure that functionality is what you need. If not, you can delete the app and go back to the market to find another app.
Step 6 – Publish your new Wix website
At this stage, everything is done. You now have a website that not only looks great, but also performs well. The final step is to publish it.
choose release in the upper right corner of the screen. Dada! Your website is now live.
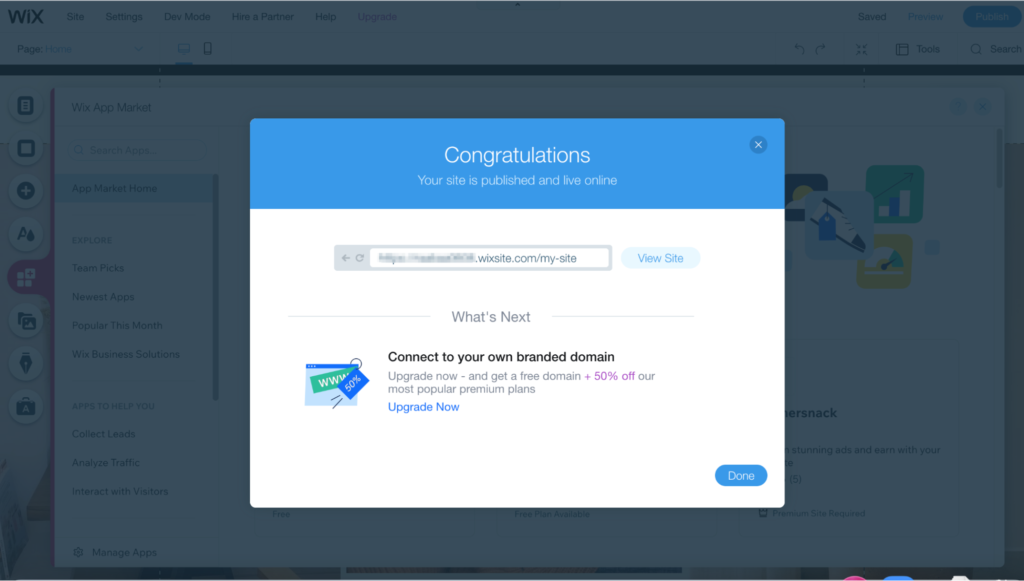
remember: Wix allows you to create subdomains or connect to custom domains. While the former is free, it looks like this: username.wixsite.com/website.
Not very professional, right? That’s why we recommend that you use a custom domain name purchased from a reputable domain registrar.
Next step
Once your website is live, you can improve it. When you use it, make sure your pages are optimized for search engines and optimized for mobile phones.
If you don’t like the design of your website, you can also edit it after publishing.After logging in just go to your dashboard, click my websiteFollowed by edit.
Want to take your Wix website to the next level? Read these Crazy Egg blogs to get started:

