

review – The Hcalory 35L Portable Car Refrigerator/Freezer is perfect for camping, picnics, and even the everyday task of keeping cool while grocery shopping, and can come in handy in these and many other situations where portable refrigeration is required. Let’s see what this portable cooling unit has to offer.
what is it?
The Hcalory 35L Portable Car Refrigerator/Freezer is a two-zone, 120-240V AC or 12-24V DC powered unit. It has a digital display so the internal temperature can be easily monitored. The unit is rated for -20°C to 20°C (-4°F to 68°F).
What’s in the box?
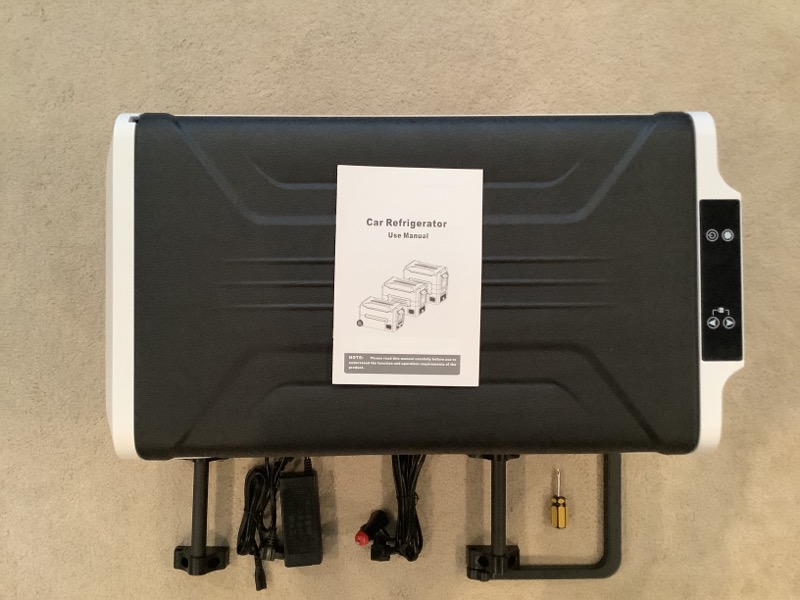
The Hcalory 35L Portable Car Refrigerator/Freezer comes in a box. Inside the refrigerator is a small box with two handles that need to be attached, one of which can be used as a drag handle. In addition, the unit has a user guide, as well as 120V-240V AC and 12V-24V DC power adapters.
Design and Features
I was a little surprised that I had to assemble the handle to the device. While it’s not hard to add handles, I’d rather have the device shipped already installed. They do provide a small Phillips head screwdriver to help with assembly, I found a cordless drill with a Phillips head drill to be a better tool. Each handle requires three screws, which are deeply embedded in the handle frame. I had to put the unit on the end of it to connect each handle, I’m just not happy having to do it. All in all, it only took about 5 minutes or so, which is no big deal, but it would have been better if I did nothing.
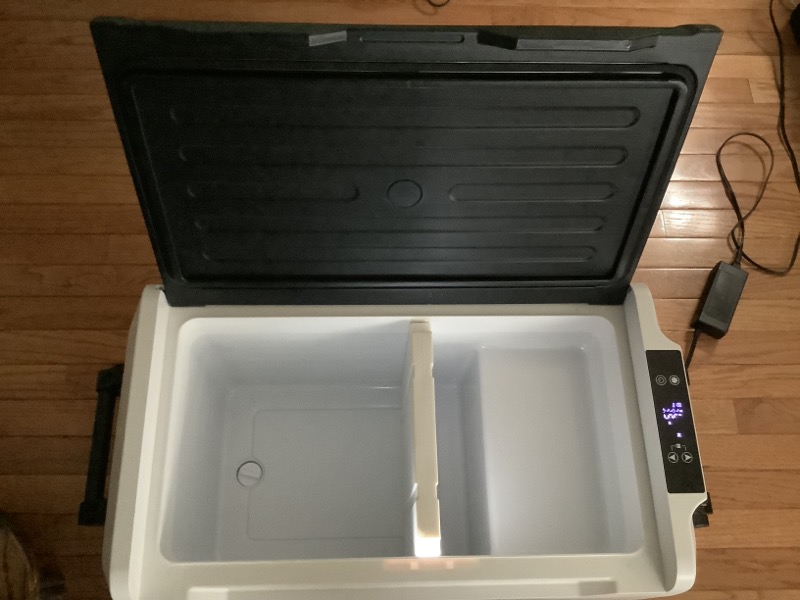
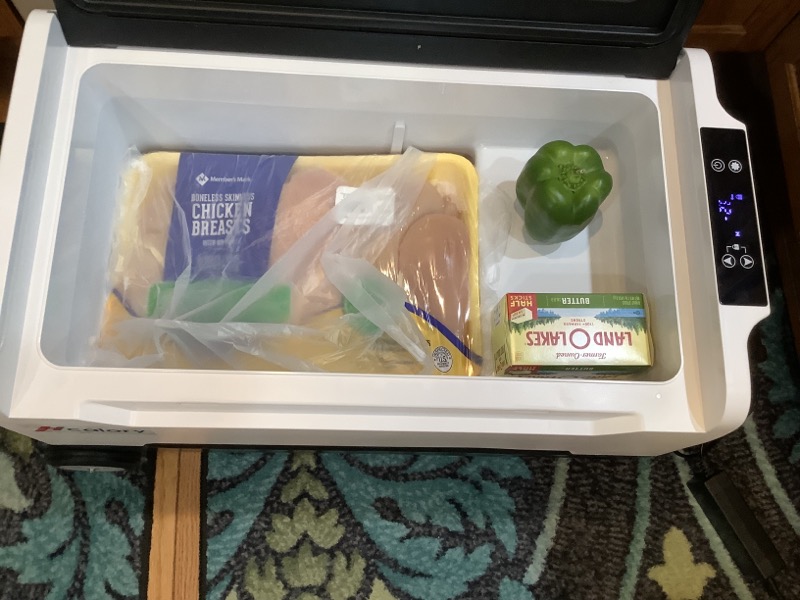
The unit is designed with two independent temperature zones; however, they are not independently controllable. There’s a main area, marked on the left with an “L” on the display when facing the open unit, and a smaller area, you guessed it, marked with an “R” on the right side. There is a removable divider to separate the units in these two areas. The right area is much smaller than the left area and includes a cutout area that houses the equipment compressor. The end of the divider looks like a magnet that activates a switch that appears to control independent displays of the current temperature in the two zones. If the divider is inserted, there are two temperatures displayed on the device, and if it is removed, there is only one.
Again, the two regions are not independently controlled. Basically the left part is controlled and the right part will be warmer because part of it is isolated from the larger controlled part and the cutout houses the compressor which I’m sure will send some heat to that area. Hcalory is empty and set to -5°C, the left side has cooled to -3°C, while the right side shows 8°C. So there is a warm side, but it’s not actually temperature controlled. It is, what it is.
The unit contains Max and Eco settings for the compressor. As one would expect, the Max setting requires more power than the Eco setting because it drives the compressor harder to reach the desired set point. I did a simple test to measure the time from room temperature (22°C) to -15°C. In Eco mode, it took almost 42 minutes. In Max mode, it only takes 28 minutes. I’m thinking if you’re using the fridge in an environment where the lid is opened and closed multiple times, and you have a good power supply, then the Max might be the right setting for you as it lowers the temperature faster when it’s due to constant exposure to refrigerated food while rising.
As mentioned, the unit can be powered by standard AC (120V or 240V) or DC (12-24V). When the compressor is in all consideration, the unit is relatively quiet. In addition, it contains circuitry when operating on DC to prevent the device from completely draining the attached battery. Basically, three set points can be selected and if it is determined that the input battery voltage is below this set point, the device will stop operating. Setpoints are designated on the display as H, M and L and range from high protection to low protection for the battery. Here’s how the setpoints break down.
| battery protection | 12V cut off | 12V access | 24V cut off | 24V access |
| L – low | 9.6V | 10.9V | 21.3V | 22.7V |
| M – Medium | 10.4V | 11.7V | 22.8V | 24.2C |
| H – high | 11.1V | 12.4V | 24.3V | 25.7V |
I haven’t had a chance to test this feature of the unit. That said, if it works as designed, it seems to be a very popular one, and I have no reason to believe it won’t.
Setup/Operation
Setting up and operating the unit is very simple. The unit’s control panel is basically in child lock mode all the time. To get out of this, just keep your finger on the up and down switches until you hear a beep, then you can interact with the other controls on the control panel. There are up and down arrows, mainly used to adjust the temperature settings of the device. Unfortunately, the unit is hardwired to only express temperature in degrees Celsius. When setting the temperature, the user controls only the left side of the device. If the separator is in place, the user will see the temperature of both sections, removing the separator will turn the entire unit into a single zoned unit. I personally find the display to look a little confusing.
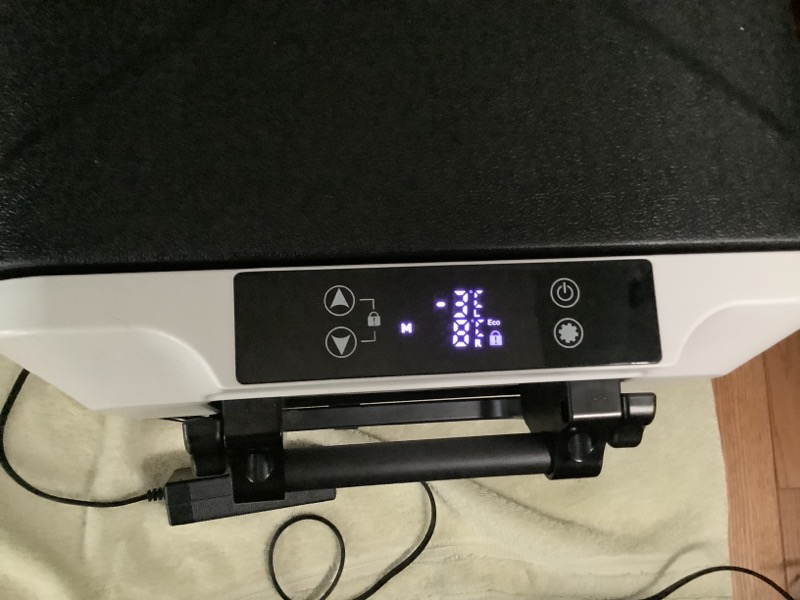
-3 is the temperature, but what looks like an E is °C with the letter “L” below it for the temperature on the left. The 8°C on the right is clearer because the “R” is easier to identify individually on the display. You can see that the display is locked, in Eco mode, and the low battery setting is set to “M” (medium).
Given the somewhat limited input on the control panel, the dance on the keys is time-based, allowing for individual settings provided by the unit. Fortunately, the most common setting is temperature, just unlock the keyboard and then use the up and down arrow keys to adjust the temperature to the desired setting. Unlocking the keyboard is very simple, users only need to put their fingers on the up and down arrow keys for about six seconds to unlock. All functions are accessible from the unlocked state. The setup key (full of gears) is overloaded because in regular mode it is used to switch the unit from Max to Eco. In another mode, press and hold the SET key for 6 seconds to achieve a low voltage setting, cycling from H, M and L. The device ships with this setting set to M (medium). I think locking the keyboard by default is great because it’s hard to accidentally change the temperature, or more importantly, turn off the device.
So let’s talk about some real-world testing scenarios.
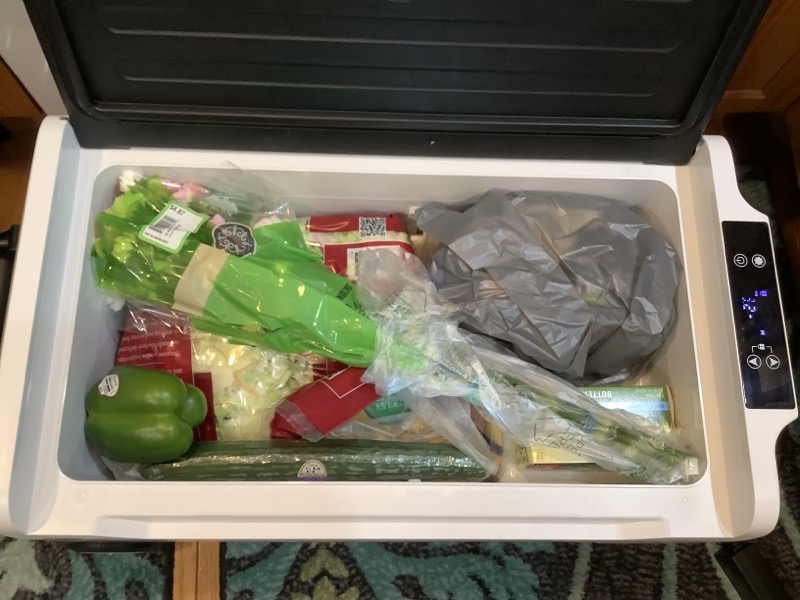
Take a trip to the grocery store. I’m sure I’m not alone in shopping at more than one store a week. Usually, when we shop at the next store, we bring a soft cooler with frozen blue ice cubes to keep refrigerated items. I decided to use the Hcalory 35 L refrigerator to see how it performs. This is a test I used with the ROCKPALS Rockpower 500 Solar Generator I recently reviewed. Since the fridge only uses around 40 watts to run, I’ll put it in the van and plug it into the ROCKPALS and set the temperature to 1°C. The unit will reach that temperature when we get to the first store. Here are some photos of two recent grocery store loads. That’s ice cream wrapped in a bag in case it melts and leaks, it doesn’t!

Another test was with a bowl of ice cream. This time I put the Hcalory outside to see how long it would take to cool the empty space, starting with partial sunlight and temperatures around 80 degrees. I set the temperature to -17°C and it took about 40 minutes to bring the internal temperature down to that level. During the cooling process, the entire unit was exposed to direct sunlight and the temperature approached 90 degrees. The black lid was hot to the touch and the internal temperature rose to -9°C. At this point, I decided to cover the device with a towel, and the internal temperature immediately dropped back to -17. It was at this point that I decided to put a bowl of ice cream in the unit and see how it streamlined. It turned out that the ice cream held its perfect shape in the four-hour test at 90s temperatures. Here are some pictures, the first is the state of the ice cream before the test and the second is the result of 4 hours in the heat of the day. I would say it was a pass that, to be fair, exceeded my expectations.


My last real-world test was using the unit to store refrigerator items during a cross-country move from the Midwest to New England (son goes to college). I filled the freezer with only the odds and ends he ate from our house freezer, plugged the device into the van’s DC outlet, and set off. This is a two-day driving event. For overnights, I use the ROCKPALS unit again to maintain the fridge overnight, replug the Hcalory fridge for the next day’s trip, and run the unit again overnight with ROCKPALS for the same cost. Moved in the next day and everything was still cold, maybe even colder than what’s in our fridge because I set the temp to 1°C which is slightly lower than the setting in my home fridge.
some specs
- Color: black+white
- Material: ABS+PP
- Household charging: AC110-240v wide voltage
- Car charger: DC12/24V universal
- Power consumption: 50W
- Capacity: 35L/45L/55L
- Temperature range: – 20 ℃ ~ 20 ℃ / – 4 ℉ ~ 68 ℉
- Battery Protection: Voltage Protection
- Noise: 35 decibels
- Control Panel: LED Display Touch Screen
- size:
35L: 710*440*450mm / 27.95*17.32*17.7inch
45L: 710*440*512mm / 27.95*17.32*20.15inch
55L: 710*440*582mm / 27.95*17.32*23inch
what do I like?
- performance of the unit.
- There are two temperature zones when needed.
- AC and DC operation
- Low power requirements.
What would I change?
- Ships without assembly
- Added ability to interact with Fahrenheit units
- Noisy display design
- The black lid should be lighter in color for better handling in direct sunlight
- The lid does not seal well.
Final thoughts?
what can I say? It’s great to be able to keep the freezer temperature without having to mess with the ice and the mess that comes with it. During the move, I used the Hcalory refrigerator again. This time, my wife and I did some early morning shopping for my son in a nearby town to get him some essentials to get him to work. Milk, eggs, lunch meat, agricultural products, etc. My son’s sleeping habits don’t quite match ours. Shopping for groceries a few hours before we put them in the fridge in our new home won’t be as hassle-free as with the Hcalory 35L Car Refrigerator/Freezer. I would say that my experience with this unit has kept me from using a Yeti-like cooler for any real extended cooling needs.
price: $270.99
where to buy (this: Calories Online Store, Banggoodand Amazon
resource: This sample review is provided by Bangood.

